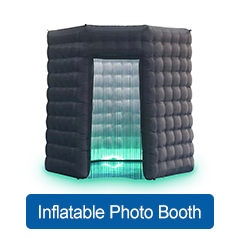
Enclosed Backdrop Igloo Tent for 360 Degree Camera Luxury LED Photo Booth Back Drop Enclosure Back Drop Spiral Green Backdrop
-
Supplier: Shenzhen Qunan Electronic Technology Co., Ltd. -
Region: Guangdong, China -
Contact: Mr Jeremy lin -
Price: $320.00 / 1 - 9 pieces
$290.00 / 10 - 49 pieces
$250.00 / 50 - 499 pieces
$99.00 / >=500 pieces -
Min. Order: 1 piece
Product details
| product: | Inflatable Photo Booth Tent | model: | I-1 |
| Material: | Durable 210D Oxford cloth | Supply capacity: | 30000 pieces per month |
| Origin: | Guangdong, China | MOQ: | 1 |
| payment terms: | L/C, Western Union, T/T | Accessories: | CE Blower + Repair + Storage bag + fixed sandbag and rope |
| size: | 2.5x2.5x2.5m/8x8x8ft (LWH) | brand: | Danda |
| Packaging Details: | Paper package | Advantage: | Environmental protection, waterproof |
| application: | Events, rental, trade fair booths, weddings, meeting rooms | ID: | Print LOGO for free |
| port: | Shenzhen | Warranty: | 2 years |
| lead: | Built-in 16-color LED lights |
you might like
 |
||
 |
 |
 |
 |
 |
 |
 |
 |
 |
Enclosed Backdrop Igloo Tent for 360 Degree Camera Luxury LED Photo Booth Back Drop Enclosure Back Drop Spiral Green Backdrop
Product Details


Specification
| serial number. | I-1 Inflatable Photo Booth |
| Material | Durable Oxford cloth or PVC tarpaulin |
| Accessories | CE Blower, Sandbags and Rope for Fixing, Repair Kit |
| advantage |
With a production workshop of 8,000 square meters, the production capacity is higher 10 years experience in the production of inflatable products Meets international quality standards and is suitable for different markets |
| What is included |
1 tent 1 blower 1 remote control with built-in LED light (optional) Repair Kit + Sandbags + Fixing and Repair Ropes |
| application |
Tents as workshop space; breakout space; fair booths; for conferences; for product displays; weddings, events, rentals; A unique tent can be customized to suit your requirements |
| inflatable tent | * Perfect for any indoor and outdoor events, including product launches, corporate events, exhibitions, weddings and homes, etc. * Inflate and deflate quickly and easily to grab headlines and take your event from mundane to extraordinary. * RGB strip lights will make the tent look more amazing at night. |
| how to install | Before installation, please check if all the parts (light strip inside the tent, remote control, power adapter, power cord, hair dryer, rope, sandbag and repair cloth) are included. ** STEP 1: Place the tent on a flat surface. Make sure the top is facing up and the zipper is on the lower bottom. * STEP 2: Locate the light controller from the bottom zipper opening of the tent. Connect the light controller and power adapter. * Step3: Take out the blower, find the air pipe on the tent, and tighten the blower and air pipe with a rope. * Step 4: Close all the zippers on the bottom of the tent. * Step5: When everything is ready, plug in the power supply (light power supply and blower power supply) and turn on the blower. After a few minutes you'll see a great yurt. * Step 6: Use the remote control (customer needs to install 2 AAA batteries - not included) - 17 lights color can be changed. *Step7: If you want to use the tent outdoors, please lay out the mat before inflating, and then fix the tent on the ground with ropes and sandbags (sand needs to be filled inside). |
VIEW MORE
You may like
-
Selfie Portable 10 Inch Pro 12.9 Roaming Photo Booth ipad Photo Booth Housing 10.9 Roamer 10.2 Standing Machine Kiosk with LCD Screen

-
Overhead Photo Booth Auto Rotating 360 Degree Camera Photo Booth Machine for Party Wedding

-
360 Degree Slow Motion Photo Booth Selfie Magic 360 Photo Booth 360 Auto Photo Booth 2023

-
Anti Shake 360 Photo Booth 360 Degree Photo Booth Ratotaing 360 Photo Booth Housing LED Background

-
Vogue Booth 360 Degree Photo Booth Background with LED Lights

-
Portable photo LED 360 photo booth inflatable cube tent for halloween photo photo booth

-
2022 Hot Sale New Portable Selfie 360 Degree Rotation Platform Business Photo Booth Camera Vending Machine Video Kiosk

-
New Foldable Selfie Mirror Photo Booth Machine LED Frame Magic Mirror Photo Booth Mirror Photo Booth with Printer Case Shipping

Other Products
-
 $99.00 - $320.00 / piece
Related Search
camera 360 degree
len for canon digit camera suppliers
360 degree rotating universal phone holder
digital 360 degree green laser level
360 degree broom sweeper
vision 360 cctv camera
360 degree rotating leather case stylus pen suppliers
tents for utes
360 degree cleaning duster
photo booth backdrop lights


